
The Demo Phase: What We Removed, What We Saved, and What We Found Beneath It All
- Reorigination

- Apr 2
- 15 min read
A room-by-room look at what she revealed once we started opening her up.
This post may contain affiliate links, which means I may earn a small commission if you choose to make a purchase through them, at no additional cost to you. I only share products we have used, love, or would genuinely recommend as you begin your own reorigination.

When people think about taking on a fixer-upper, demo feels like the exciting part!
(If you're new here, this "fixer-upper" has been quite the journey over the last few years, check the recap out here)
It’s where things finally start to change. Where you get to tear out what’s outdated and start imagining what could be instead.
And to be fair, that part was exciting for… JM.
For me, however, it was the part that made me the most nervous!
I did NOT want to be the person who accidentally destroyed something original, important, or irreplaceable without even realizing it.
Looking back now, I can laugh a little. I was making him keep the most random, broken-off pieces of things, just in case. Pieces he probably knew the whole time were never going to make their way back into the house.
But for my sanity, and probably for the sake of our marriage, he kept everything anyway.
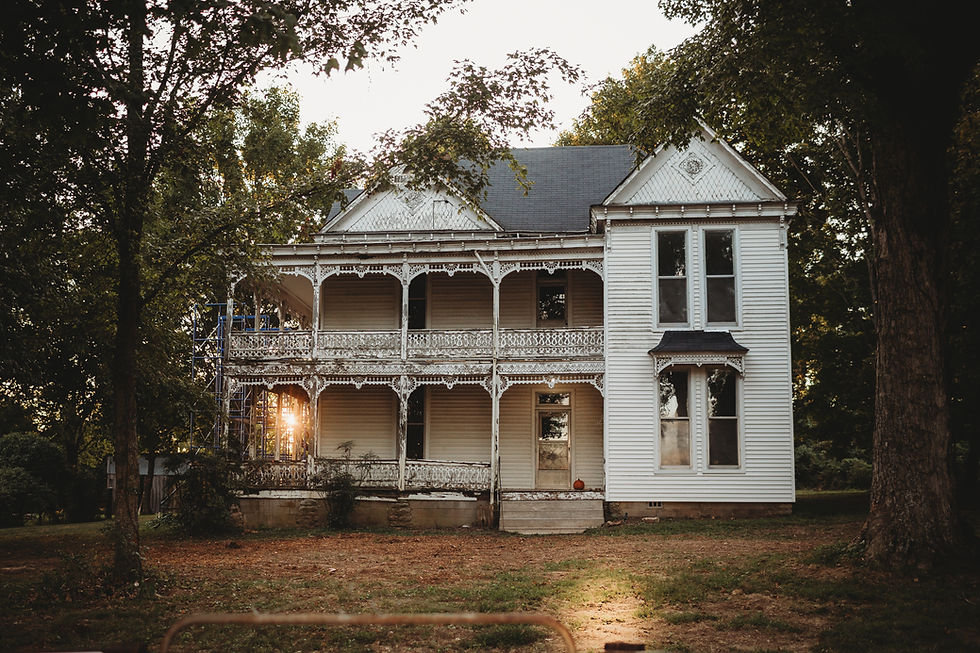
Our house, Maggie, though wasn’t just a fixer-upper. She was a house built in 1898.
Demo in a house like this isn’t just about removing what’s there all the way back to the studs and starting clean. It’s about figuring out what actually matters.
In the early stages, before we really got into demo, we spent a lot of time trying to understand what we were walking into. We talked to inspectors, contractors, and people who had done this before. Anyone who could give us a clearer picture of what to expect. (We shared more of that in our last post, Where Do You Even Start?, if you’re at that phase too.)

No matter who we talked to, the same themes kept coming up.
Slow down.
Pay attention to what’s original.
Document everything.
Be mindful of what you open up, because you might uncover more than you planned for.
At the time, it felt like a mix of things we already knew, or thought we knew, along with a lot of information coming at us all at once.
They say you never really know until you know…(shout out to my Swifties)
That could not have been more true once we started opening her up.
Pretty quickly, we realized those weren’t just general recommendations.
They were the difference between tearing a house apart and actually understanding how to bring it back.
Every space in the house told a slightly different story.
Some had been carefully covered over time. Others had been worn down or altered out of necessity, and a few revealed things we never expected to find at all…(cue the side eye)
So…jump on the magic school bus, kids.
We’re about to take a trip through what we uncovered, room by room!
What We Actually Used for Demo
If you’re in the middle of your own project and don’t know where to start, we pulled together the exact tools we used during this phase.
The Hallway

As we step into the house, we enter the hallway.
This was one of the first places that, during our initial walk-through, felt like it didn’t really need anything. It’s wide, about 9 feet across, and even at first glance, you could see a lot of the original character was still there. The floors were original. The staircase was intact. Nothing had really been closed off or reworked.
It felt…fine.
And in some ways, it was.
But it was also one of the first places where we realized that just because something looks finished doesn’t mean it’s actually been understood.
Standing in that space, I remember thinking…what was this originally meant to feel like? Had anything changed over time? How was the space intended to function? Even something as simple as how air, light, and people moved through it.
We knew not everything needed to be completely torn apart.
But we did need to start inspecting.
The walls and ceilings were wrapped in ½ inch drywall and painted in a light neutral color that felt like it was trying to brighten the space without really understanding or capitalizing on it.
And it was at this point that JM was given the green light to start opening her up so we could start seeing a different story come through.
Once the drywall began to come down, it led to our first real discovery…an old wallpaper pattern.

And then more.
Uncovering that wallpaper, and many others, was a journey in itself. Each pass revealed something new, almost like flipping through a time capsule of different decades and design choices. In some places, the earliest material was even still intact, with the original fabric-backed wallpaper and tacks holding on underneath it all.
We kept going until we worked our way all the way back to the original tongue and groove walls. (Which, in the long run, we also had to temporarily take down in some places and rework… but that’s a story for another day.)
This wasn’t one of those big, dramatic reveal moments.
It was quieter than that, which honestly made it more satisfying. It gave us a real appreciation for just how much of this house had been hidden and preserved.
The demo itself was pretty straightforward. The drywall and wallpaper came down and went into the dumpster. The added bathroom at the back of the hallway, originally part of the back porch, was fully gutted since it didn’t belong to the original layout and didn’t fit our long-term plan to restore the hallway so it could flow uninterrupted from front to back, allowing light and air to move through the space again.

But what mattered most here was what we didn’t remove. (We break down the defining features of Victorian farmhouses here.)
We kept the original staircase (even though I’m STILL working through layers of paint removal…), the original floors, the door frames, transoms, and doors, and any hardware that could be cleaned and reused.
I even saved pieces of all those wallpapers to potentially frame later.
And still, even in a hallway that felt simple, trust me, there were surprises.

The funniest was probably a hoard of peanut shells and nests tucked behind walls and above the door frames (a friendly reminder of why you look behind everything…). And the most intriguing was a small hollow cubby under the stair turn that felt like it had to be hiding something. Money? Journals? Secret codes?
Spoiler alert: it was empty.
This was one of the first places it really clicked:
Just because something looks finished doesn’t mean it belongs. And just because something is covered doesn’t mean it’s gone.
Sometimes it’s just waiting to be discovered again.
The Parlor

Next on the tour, as we move through the hallway and turn right, we enter the parlor.
The parlor was a critically important room in the house, so it was expected, and pretty clear, that this space had been well used over the years.
At first glance, it didn’t look terrible. Just dated. Maybe a little tired.
The kind of room where you think, okay…we can work with this.
So we started pulling up what looked like a standard vinyl floor, using a basic pry bar & fingers crossed, fully hoping the original wood floors were underneath and in good condition.
After all the effort of getting that first layer up…we were met with a full layer of plywood.
Not exactly what we were hoping for, but we kept moving.
Once that came up, we got our first glimpse at what looked like parquet wood flooring, or at least some sort of more detailed wood design.
And I got really excited.
Like, wait…do we have fancy wood floors in the fancy parlor?
JM kept working through it.
And pretty quickly, we realized…drumroll please…
it was just another layer of vinyl.
But…a FANCIER vinyl.
Clearly the old house spirits are laughing knowing this was not going to be a quick refresh or a quick reveal, but we kept going.
And eventually, guess what?
We made our way all the way back to the original hardwood floors.
All still in good shape.
The floors told one story.
The walls told another.
They were finished in what looked like a standard faux wood paneling. Nothing too offensive (I think this is even coming back), just another update that had been added at some point along the way.
With his demo shirt on and confidence up, JM started taking down the paneling to find once again there was more going on underneath.
Behind the paneling were multiple layers of wallpaper, all applied directly to the original tongue and groove walls but unlike the hallway, where everything had been covered with drywall, this room had just been built on top of.

One decision layered over another, each one trying to update the space without ever really going back to what was originally there.
Prybars up and scrapers out, we kept going.
Peeling things back, one step at a time, until we got all the way down to the original tongue and groove walls here as well.

And just like the floors, they were still there.
Still solid. Still worth saving.
The ceiling, though… had its own situation going on.
At some point, it had been finished with an acoustical “popcorn” spray that didn’t just stay on the ceiling. Overspray had made its way onto the wood walls as well, which meant removing it wasn’t just a “scrape and move on” kind of project.
It took time. Patience. And a lot more effort than we originally expected.
But piece by piece, it came down too, as well as the ceiling fan.
And underneath it, we uncovered a beautiful, natural wood tongue and groove ceiling.
Once everything was uncovered, we could clearly see what was worth holding onto.
We saved the original floorboards, all of the tongue and groove walls, and that beautiful wood ceiling. The original fireplace mantel and tile were still there, and we kept those as well, along with all of the original windows and the surrounding window and door trim.
It was one of those moments where, after all the work of taking things apart, you could finally see what the room actually was and could be again!
But records scratch…and then came the part demo doesn’t always prepare you for.
Up until this point, everything we were uncovering felt like progress. Hard work, yes. Time-consuming, absolutely. But still moving us closer to understanding the space.
This was different.
Once the floors were up and we started looking at what was happening underneath, we realized the house had settled more than we expected.

Over about a 12-foot span, the floor had dropped roughly 2½ inches.
And once you see it, you can’t unsee it.
The front wall had also started to bow outward, just enough to know it wasn’t something you could ignore.
So what started as “let’s see what’s under here” quickly turned into “okay…we need to figure this out before we go any further.”
And that if we were going to do this right, we needed to slow down and understand it before moving forward.
Not everything is surface-level.
And sometimes, what you uncover isn’t just about what to keep.
It’s about recognizing what needs attention before anything else can move forward.
The Dining Room

Next stop on this trip is not far, as we move through the parlor, we can enter the dining room either directly from there or from the hallway.
This room felt more connected to the original flow of the house, but like everything else, it had been changed over time.
The floors followed a familiar pattern: A worn vinyl layer sat on top, with underlayment beneath it, and then the original wood floors underneath it all.
So alas, everything above the original floors came out.
The walls however told a slightly different story.
The lower portion of the room, about the bottom quarter, had an adorable beadboard and chair rail that appeared to be original. That part felt like it had always belonged.
Above that adorableness though, things started to shift.
There we were greeted with another variation of a lighter-colored faux wood paneling, and behind that, a layer of masonite that had been covered in wallpaper. And I know it will be hard to believe, but once that came down, we found more wallpaper applied directly to the tongue and groove walls.
So again, it wasn’t that things had been removed.
They had just been covered.
The ceiling had the same acoustical finish we had seen in other rooms, and that came down as well.
And then…this room decided to make things interesting.
At some point during demo (not sure when because I blacked out), we realized we were not alone in here.

Snakes.
Multiple snakes.
And not just passing through.
They had clearly made themselves
comfortable.
Of all places, primarily in the exact spot where my future bedroom — and my dreams and aspirations — were supposed to go.
Which…
absolutely not.
How was I ever supposed to sleep in this space?
To no surprise, JM handled it, but let the record show that I supervised from a very safe and respectful distance.
Once we worked through that situation…
we were able to get back to what mattered.
We saved the original beadboard and chair rail, the fireplace mantel, and the remaining tile, along with the original floors and trim.
Lastly, the windows in this room stood out.

By this point, we had a better sense of what was original in the house, and these were clearly replacements.
While the rest of the house had 1-over-1 windows, this room had 4-over-4 replacements that had been nailed shut.
So those will be replaced to better match the rest of the house.
Sometimes it’s not just about what’s been changed.
It’s about what’s been added, and what doesn’t belong anymore.
And occasionally…
you’re going to uncover things you definitely weren’t planning on.
The Kitchen

As we exit the dining room and step into the kitchen, the shift is immediate.
From the start, this room felt different.
Where other spaces had been covered over time, this one felt like it had just been worn down.
There was visible weathering. Damage. Signs that this part of the house had taken on more exposure than the rest.
The back door was barely holding together (not gonna lie, kind of felt like a metaphor for my mental health and checkbook at this point).
The storm windows were broken, and there was a buildup of leaves and debris caught between the layers of the windows, letting moisture sit in the space longer than it should have.
It didn’t feel like a room that had been preserved.
It felt like a room that had been holding on.
Holding on through years of use, home-cooked meals, and everyday life… and then sitting vacant, quietly waiting for someone to come back.
The walls were a mix of materials.
Around the lower portion, there was masonite that had been used to mimic a tile-like surface. Above that, faux wood paneling.
And beneath it all, the original tongue and groove walls.
But this time, there was a bit of a twist.
This was the only room where those original walls had been painted, a soft, light green that still showed through once everything else was removed.

I’m sure there’s some historical significance to that…something I’ll probably go down a rabbit hole on later. TBD.
But for now, we kept moving.
The floors told a familiar story, just with a few extra steps along the way.
Layer after layer had been added over time, and one by one, they came up until we made our way back to the original flooring beneath it all.
Another reminder that what we were looking for had often been there the whole time, just hidden under years of updates.
Everything that had been added over time came out, including the cabinets, the sink, the wall coverings, and the acoustical ceiling.
Even the back door, while it couldn’t continue serving its original purpose in this space, was carefully removed so it could be reused elsewhere.
Because sometimes restoration isn’t about putting something back exactly where it was.
It’s about finding a new way for it to belong again.
And then there were the things you couldn’t ignore.
A large patched section in the ceiling where a third chimney had once come through.
And a small electrical panel sitting on the right wall (how am I going to design around that?)
The kind of details that immediately pull your attention, whether you’re ready for them or not, because not every room gives you something beautiful right away.
Sometimes, the first step is just clearing everything out so you can finally see what you’re working with, and what new challenges you can solve.
The Bedrooms
Let’s be sure to look both ways as we cross the hallway into the left side of the house, where the two bedrooms sit, eventually becoming known to us as the blue room and the pink room.
These two rooms were similar in structure, but each had its own personality right from the start.
The Blue Room

The back bedroom, which we came to call the blue room, had a cork floor laid over a layer of plywood.
Underneath that was the original wood flooring.
So like many of the other rooms, everything above the original floors came out.
The walls had been covered in the same drywall we saw in the hallway (painted blue… I know, shocker), and once that was removed, we were brought back to the original tongue and groove walls.
Unlike some of the other rooms, there was little to no wallpaper left here. It felt simpler.
More straightforward.
The ceiling had the same acoustical finish we had seen throughout the house, along with a single porcelain light fixture.
This room didn’t have a closet, which felt consistent with how some original bedrooms in houses like this were designed.
The fireplace and mantel were still there, and amazingly, so was all of the original tile, if you took the time to look behind the giant space heater that had been added in front of it.
The Pink Room

The front bedroom, the pink room, told a slightly different story.
This was the only room in the house with carpet, laid directly over the original floors.
Once that came up, we were back to the wood underneath.
The walls followed a similar pattern to the blue room, with drywall on top (painted pink, of course) and tongue and groove beneath.
But this room had a little more personality hiding underneath.
Because once we started removing everything…
after the pink drywall came down, we uncovered a layer of pink wallpaper.
Layer after layer of pinkness.

It was clear this room had fully committed to the theme at some point, so who am I to discontinue that moving forward?
So guess what, team?
Pink is going to be in the color scheme of this house.
Because honestly…you have to respect that.
This room also had a closet, and inside it, the wallpaper continued, applied directly to the walls.
The fireplace here was larger, but unlike the blue room, the original tile was missing entirely, leaving just the opening and the structure behind it.
Shared Details
Both rooms had exterior doors that opened out onto the porch.
And both of those doors showed signs of wear, with added bracing that suggested they had either failed at some point or needed reinforcement over time.
The original windows in both rooms were still intact, and all of the trim was carefully removed and saved so it could be restored and brought back.
Like the other spaces, we kept what mattered.
The floors. The walls. The remaining original details.
Even rooms that start out similar can tell completely different stories.
And sometimes, personality shows up in ways you weren’t expecting.
The Exterior (Initial Demo)

As we step back outside to end this trip, the exterior told a similar story to what we had seen inside.
Not everything needed to be torn apart right away, so our initial focus here wasn’t full demo.
It was more about uncovering what was there and assessing what could be saved.
The biggest change was removing the vinyl siding that had been added over the original clapboard.
And just like inside, once that came off, we were able to start seeing the house for what it actually was.
We also removed the aluminum storm windows, carefully setting them aside so they could be reworked and brought back in a way that made more sense.
Because even out here, the goal wasn’t just to strip everything away.
It was to understand what belonged.
The porch, though, gave us a clearer direction.
We removed the ceiling, which had been rotting and had signs of pest damage (squirrels are no longer cute to me), and started opening things up so we could see what we were really working with.
Some elements, like pieces of the original gingerbread detailing, were carefully taken down and saved where possible, but it was also clear that not everything out here was going to be salvageable.
And that friends, would eventually become a much larger project.
But for this phase, the priority was simple.
Expose what we could. Preserve what mattered. And start building a plan for what comes next because this house wasn’t going to be something we were fixing. It was something we were learning.
Another Beginning

By the time we made our way through every room, demo looked a lot different than what we originally expected.
It wasn’t just about removing what was there.
It was about understanding what had been added, what had been covered, and what was still worth holding onto.
Each space told its own story.
Some felt preserved. Some felt layered over time. And others felt like they had simply been holding on.
But in every room, there was something that remained.
Something original.Something worth saving.Something that reminded us this house still had more to give.
And that’s really what this phase became for us.
Not just demolition.
But discovery.
Learning where to slow down.Learning what to keep.And learning that sometimes, what looks like a project on the surface is actually something much deeper once you start peeling it back.
Because restoring an old house isn’t about making it new.
It’s about understanding what it was, so you can thoughtfully decide what it becomes next.
It’s about giving it another beginning. Welcome to Reorigination.
Starting your own demo?
We put together a full list of the tools we actually used during this phase.


Comments